Tutorial for the NetworkX backend
Part 1: Rewriting simple graph with attributes
Let us start by importing the necessary data structures and functions:
from regraph import NXGraph, Rule
from regraph import plot_graph, plot_instance, plot_rule
Creating and modifying a graph object
ReGraph implements a wrapper around NetworkX’s directed graph objects (nx.DiGraph) through the NXGraph class. The following snippet illustrates how a directed graph object can be created:
# Create an empty graph object
graph = NXGraph()

# Add a list of nodes, optionally with attributes
graph.add_nodes_from(
    [
        'Alice',
        ('Bob', {'age': 15, 'gender': 'male'}),
        ('Jane', {'age': 40, 'gender': 'female'}),
        ('Eric', {'age': 55, 'gender': 'male'})
])

# Add a list of edges, optionally with attributes
graph.add_edges_from([
    ("Alice", "Bob"),
    ("Jane", "Bob", {"type": "parent", "since": 1993}),
    ("Eric", "Jane", {"type": "friend", "since": 1985}),
    ("Eric", "Alice", {"type": "parent", "since": 1992}),
])
We can print the list of nodes and edges of the created graph objects with data attached to them:
print("List of nodes: ")
for n, attrs in graph.nodes(data=True):
    print("\t", n, attrs)
print("List of edges: ")
for s, t, attrs in graph.edges(data=True):
    print("\t{}->{}".format(s, t), attrs)
We can add individual nodes and edges as follows:
graph.add_node('Sandra', {'age': 45, 'gender': 'female'})
graph.add_edge("Sandra", "Eric", {"type": "spouse", "since": 1990})
graph.add_edge("Eric", "Sandra", {"type": "spouse", "since": 1990})
graph.add_edge("Sandra", "Alice", {"type": "parent", "since": 1992})
We can also add and access node and edge attributes:
graph.add_node_attrs("Alice", {"age": 18, "gender": "female"})
graph.add_edge_attrs("Alice", "Bob", {"type": "friend", "since": 2004})

# Get attributes of nodes and edges
print("New Alice attibutes: ", graph.get_node("Alice"))
print("New Alice->Bob attributes: ", graph.get_edge("Alice", "Bob"))
Note that the attributes of the nodes/edges are converted to regraph.attribute_sets.FiniteSet objects. See the tutorial on advanced attribute values (see Advanced node and edge attributes) for more details on the underlying data structures.
>>> for k, v in graph.get_node("Alice").items():
>>>    print(k, ": ", v, ", type: ", type(v))
age :  {18} , type:  <class 'regraph.attribute_sets.FiniteSet'>
gender :  {'female'} , type:  <class 'regraph.attribute_sets.FiniteSet'>
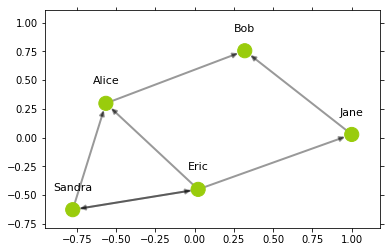
ReGraph provides some utils for plotting NetworkX-based graphs
>>> positioning = plot_graph(graph)
Graph objects can me dumped to dictionaries following the JSON format (note how the attribute values are encoded).
>>> graph.to_json()
{'edges': [{'from': 'Alice',
   'to': 'Bob',
   'attrs': {'type': {'type': 'FiniteSet', 'data': ['friend']},
    'since': {'type': 'FiniteSet', 'data': [2004]}}},
  {'from': 'Jane',
   'to': 'Bob',
   'attrs': {'type': {'type': 'FiniteSet', 'data': ['parent']},
    'since': {'type': 'FiniteSet', 'data': [1993]}}},
  {'from': 'Eric',
   'to': 'Jane',
   'attrs': {'type': {'type': 'FiniteSet', 'data': ['friend']},
    'since': {'type': 'FiniteSet', 'data': [1985]}}},
  {'from': 'Eric',
   'to': 'Alice',
   'attrs': {'type': {'type': 'FiniteSet', 'data': ['parent']},
    'since': {'type': 'FiniteSet', 'data': [1992]}}},
  {'from': 'Eric',
   'to': 'Sandra',
   'attrs': {'type': {'type': 'FiniteSet', 'data': ['spouse']},
    'since': {'type': 'FiniteSet', 'data': [1990]}}},
  {'from': 'Sandra',
   'to': 'Eric',
   'attrs': {'type': {'type': 'FiniteSet', 'data': ['spouse']},
    'since': {'type': 'FiniteSet', 'data': [1990]}}},
  {'from': 'Sandra',
   'to': 'Alice',
   'attrs': {'type': {'type': 'FiniteSet', 'data': ['parent']},
    'since': {'type': 'FiniteSet', 'data': [1992]}}}],
 'nodes': [{'id': 'Alice',
   'attrs': {'age': {'type': 'FiniteSet', 'data': [18]},
    'gender': {'type': 'FiniteSet', 'data': ['female']}}},
  {'id': 'Bob',
   'attrs': {'age': {'type': 'FiniteSet', 'data': [15]},
    'gender': {'type': 'FiniteSet', 'data': ['male']}}},
  {'id': 'Jane',
   'attrs': {'age': {'type': 'FiniteSet', 'data': [40]},
    'gender': {'type': 'FiniteSet', 'data': ['female']}}},
  {'id': 'Eric',
   'attrs': {'age': {'type': 'FiniteSet', 'data': [55]},
    'gender': {'type': 'FiniteSet', 'data': ['male']}}},
  {'id': 'Sandra',
   'attrs': {'age': {'type': 'FiniteSet', 'data': [45]},
    'gender': {'type': 'FiniteSet', 'data': ['female']}}}]}
Finding graph patterns
Let us first initialize a pattern graph:
pattern = NXGraph()
pattern.add_nodes_from(["x", "y", "z"])
pattern.add_edges_from([
    ("x", "y"),
    ("z", "y")
])
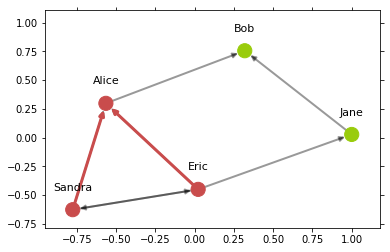
Matches of the pattern in the previously created graph can be found as follows:
>>> instances = graph.find_matching(pattern)
>>> print(instances)
[{'x': 'Sandra', 'y': 'Alice', 'z': 'Eric'}, {'z': 'Sandra', 'y': 'Alice', 'x': 'Eric'}, {'x': 'Alice', 'y': 'Bob', 'z': 'Jane'}, {'z': 'Alice', 'y': 'Bob', 'x': 'Jane'}]
We can equip pattern nodes and edges with attributes, then ReGraph will look for all subgraphs matching to the structure of the pattern and whose elements contain respective attributes.
>>> pattern.add_edge_attrs("x", "y", {"type": "parent"})
>>> pattern.add_edge_attrs("z", "y", {"type": "parent"})
>>> instances = graph.find_matching(pattern)
>>> print(instances)
[{'x': 'Sandra', 'y': 'Alice', 'z': 'Eric'}, {'z': 'Sandra', 'y': 'Alice', 'x': 'Eric'}]
We can plot matchings inside the graph using plot_instance.
>>> print(instances[0])
>>> plot_instance(graph, pattern, instances[0], parent_pos=positioning)
Rewriting graph objects
ReGraph implements the rewriting technique called Sesqui-pushout rewriting that allows to transform graphs by applying rules through their instances (matchings). It allows to express the following graph transformations:
node cloning,
node/edge removal,
node/edge attributes removal,
node merging,
node/edge addition,
node/edge attribute addition.
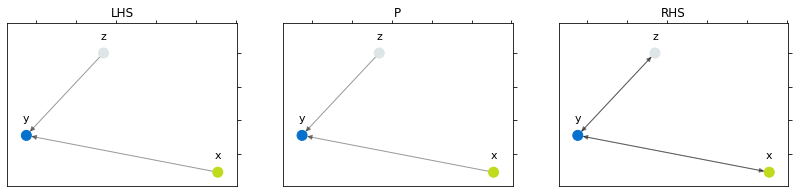
A rewriting rule is a span LHS <- P -> RHS`, where LHS is a graph that represents a left-hand side of the rule, a pattern that is going to be matched inside of the input graph, P is a graph that represents the interfaces of the rule, together with a homomorphism LHS <- P it specifies nodes and edges that are going to be preserved in the course of application of the rule. RHS and a homomorphism P -> RHS, on the other hand, specify nodes and edges that are going to be added. In addition, if two nodes in P map to the same node in LHS, this node is going to be cloned during graph rewriting. Symmetrically, if two nodes in P match to the same node in RHS, these nodes are merged.
To rewrite the graph, we first create a rewriting rule (see rules_tutorial for more examples of rules and means for their creation provided by ReGraph). A data structure for rewriting rules is implemeted in the class regraph.rules.Rule. Here, we will use the created pattern to initialize a rule. ReGraph implements the util plot_rule ror rule visualization.
Let us create a rule:
rule = Rule.from_transform(pattern)
rule.inject_add_edge("y", "x", {"type": "child_of"})
rule.inject_add_edge("y", "z", {"type": "child_of"})

plot_rule(rule)
Graph rewriting can be performed with the rewrite method of NXGraph. It takes as input a rule and an instance of this rule. Rewriting is performed in-place, the provided graph object is modified and a dictionary corresponding to the RHS matching in the rewritten graph is returned.
Let us first back-up the original graph and, then, rewrite it using the first instance we found:
>>> graph_backup = NXGraph.copy(graph)
>>> rhs_graph = graph.rewrite(rule, instances[0])
First, we plot the selected pattern instance in the backed-up graph:
>>> plot_instance(graph_backup, rule.lhs, instances[0], parent_pos=positioning)

Then, we plot the RHS instance in the transformed graph:
>>> new_pos = plot_instance(graph, rule.rhs, rhs_graph, parent_pos=positioning)

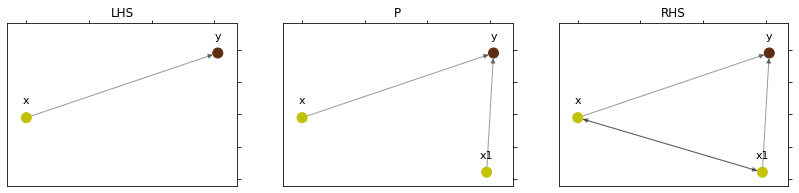
Let us consider another example of a rewriting rule:
pattern = NXGraph()
pattern.add_nodes_from(["x", "y"])
pattern.add_edge("x", "y", {"type": "parent"})

# Initialize a rule that clones `x`, note that tha variable `rhs_clone_id`
# corresponds to the ID of the newly produced clone in the RHS of the rule
rule = Rule.from_transform(pattern)
_, rhs_clone_id = rule.inject_clone_node("x")
rule.inject_add_edge("x", rhs_clone_id, {"type": "spouse"})
rule.inject_add_edge(rhs_clone_id, "x", {"type": "spouse"})
>>> plot_rule(rule)
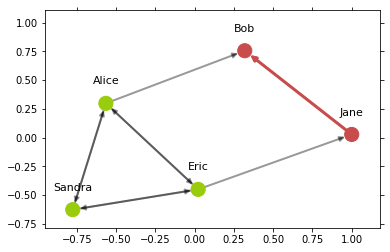
Let us fix an instace of the rule:
>>> instance = {'x': 'Jane', 'y': 'Bob'}
>>> new_pos = plot_instance(graph, rule.lhs, instance, parent_pos=new_pos)
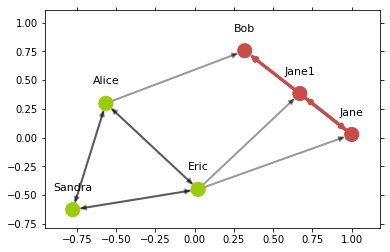
>>> rhs_graph = graph.rewrite(rule, instance)
>>> new_pos = plot_instance(graph, rule.rhs, rhs_graph, parent_pos=new_pos)
Next
Continue to Part 2: Rewriting hierarchies of graphs to learn about graph hierarchies and their rewriting.
See more
Module reference: NetworkX-based graphs